
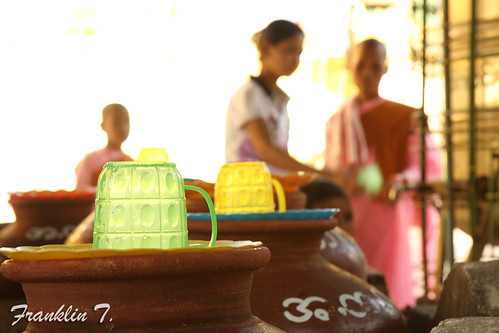
A drop of crisp water
Originally uploaded by Franklin T..
ဒီတစ္ေခါက္ ျမန္မာျပည္ကို ျပန္ေရာက္ေတာ့ ပဲခူး ေ႐ႊေမာ္ေဓာဘုရားကို ေရာက္ျဖစ္ခဲ့ပါတယ္... ဘုရားဖူးရင္း.. ဓါတ္ပံုေတြလဲ လိုက္႐ိုက္ရင္းပဲ ဆိုပါေတာ့... ဘုရားေပၚမွာ ေလွ်ာက္ၾကည္႕ရင္းကေနပဲ မယ္သီလရင္ေတြ အမ်ားႀကီး စုထိုင္ၿပီး သစ္ပင္ရိပ္ကေလး တစ္ခုမွာ နားေနတဲ့ ေနရာေလးကို ေရာက္သြားခဲ့တယ္... အေပၚက ပံုေလးကို အဲဒီနားက ေရအိုးဆင္ေလးကေန လွမ္း႐ိုက္ၿပီး ရခဲ့တာပါ... ဒီတစ္ေခါက္ ျမန္မာျပည္က အျပန္မွာ အႀကိဳက္ဆံုးပံုကို ျပပါဆိုရင္ေတာ့ ဒီပံုေလးပဲ ျဖစ္မယ္ထင္ပါတယ္...
နာမည္ကိုေတာ့ ေဇာ္ျမင့္သူ Nova အႀကံေပးသလို.. “ဒါန” လို႔ နာမည္ေလး ေပးလိုက္ပါတယ္...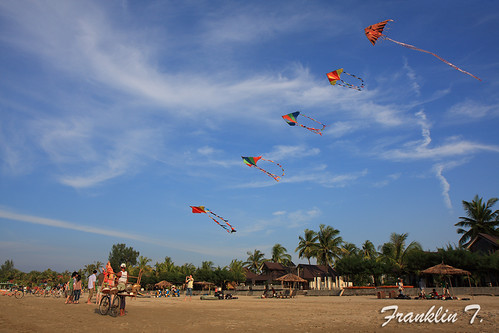
Kites
Originally uploaded by Franklin T..
ဒီ အထက္က ပံုေလးကေတာ့ ေခ်ာင္းသာမွာ ႐ိုက္ခဲ့တာပါ... စစေရာက္ခ်င္း ေန႔ထဲက သတိထားမိတာ အဲဒီ စြန္ေလးေတြပါပဲ... ေနာက္တစ္ေန႔မွာေတာ့ စက္ဘီးငွားၿပီး စြန္သည္ေလးေနာက္ကို အေျပးအလႊားေလးလိုက္.. ဒီ ဓါတ္ပံုေလးရေအာင္ ႐ိုက္ခဲ့ရတာပါပဲ...
နာမည္ကိုေတာ့ “မိုးေပၚမွာေနခ်င္တယ္” ဆိုတဲ့ မ်ဳိးေက်ာ့ၿမဳိင္ ရဲ႕ သီခ်င္းေခါင္းစဥ္ေလးပဲ ေပးလိုက္ရမလား စိတ္ကူးမိတယ္...
Sunday, December 27, 2009
ဒါန ႏွင့္ မိုးေပၚမွာ ေနခ်င္တယ္
Wednesday, June 10, 2009
MacBook Ghetto
 After playing around with iDeneb 10.5.5 distro, I ended up messing around with iPC OSx86 10.5.6 Universal Ed. on my little Sony VGN-BX660P this Monday. It is working flawlessly so far! This version has the support for 1280x800 resolution display, which fixes my display issue with the white band under the dock.
Before going into the details, check out my Sony BX660P's specs so that we are on the same page. Also, Intel PRO/Wireless 3945ABG will not work but everything else will work including Verizon PC5750 Broadband Access card (as far as I have tested). I used Linksys WPC54GS (V.1.2) which has the Broadcom chip for my wireless, and Airport recognizes it as soon as you plug in.
DON'T rush to your laptop and boot into Mac OSX Installer yet. If you still have Windows XP/ Vista running on your system, type msinfo32.exe to open up the system information window first. Then do a save as of *.nfo file as well as exporting the system information to a text file. Keep it on a flash drive. It will become very useful when you install Marvell Yukon 88E8055 network adapter.
If you are a noob like me, see my previous post with step-by-step on booting from DVD all the way to partitioning the disk using Disk Utility. When you get to the Install Summary page, click customize and select the following drivers and patches ONLY.
1. iPC OSx86 10.5.6 Base System
Under iPC OSx86 10.5.6 Intel AMD SSE2 SSE3
2. Drivers> Video Drivers> Intel> Intel GMA950
3. Drivers> Chipset Drivers> Intel ICHx SATA Drivers
4. Drivers> Audio Drivers> Other Audio Drivers> Azalia Audio
5. Drivers> Ethernet Drivers> Marvell Yukon 88E8056
6. Drivers> Wireless Drivers> Broadcom Driver (for Linksys WPC54GS)
7. Drivers> Power Management> PowerManagement Package
8. Fixes and Patches> IOPCMCIAFamily
9. Fixes and Patches> PS/2 Device Support> PS/2 Keyboard Fix
10. All Applications except AMD related items.
That's it. Reboot the computer. Make sure to press F8 and boot with -F -v boot flags when you reboot. This is to ensure all the kexts are loaded for the first time.
At this point, everything should be working except wireless and Marvell Yukon ethernet adapter. Read this post of Sophitia on how to make Marvell Yukon 88E8055 work. You will be replacing the value of IOPCISecondaryMatch, which is the SubSys ID of your device. Remember that *.nfo or *.txt file created in Windows earlier? You can find that SubSys ID for your Marvell Yukon under Components> Network> Adapter.
I call mine "MacBook Ghetto". :P
Important note: This guide is intended only for testing and educational purpose. If you like to use Mac OS X Leopard, buy the real Mac. Nothing is better than original hardware and software.
Saturday, June 06, 2009
Apple and me
 Got a Sony BX660P laptop and not sure what to do with that junk? Load Mac OS X Leopard. :) Here's how to do that.
You will need iDeneb v1.3 (Mac OS X 10.5.5) DVD to get started. ImgBurn was used to burn the ISO image. It's a great free program. Using Roxio Easy Media Creator 10 caused me a few days of troubleshooting with "/Library/Preferences/SystemConfiguration/com.apple.boot.plist not found" error and I could not even boot into the installation screen. The problem was Roxio only burned the boot loader part of the image and not the rest.
Here's the specs of my Sony laptop.
Model: VGN-BX660P
CPU: Intel Core 2 Duo T7200 (2GHz)
Chipset: Intel 945 GM
Video: Intel GMA Graphics (internal graphics)
Sound: Realtek High Definition Audio
Ethernet: Marvell Yukon 88E8055 Gigabit Ethernet
Wireless: Intel PRO/Wireless 3945ABG
Everything is working great except the following minor items.
1. Wireless - There's no kext (driver support) for this wireless adapter though this might work for you.
2. The usable screen resolution is 1280 x 768 though the actual display has 1280 x 800. There will be a small white band under the dock.
3. Sleep mode - the screen will go blank and never come back up. So you will need to disable the system standby.
Step-by-step installation guide
1. Boot from the DVD, and press F8 to use boot options. At the boot prompt, type -v and hit enter. This option is useful in case if you have any trouble booting.
2. If everything is OK at boot, you will get to the following screen. Click next arrow.
3. Now go to Utilities> Disk Utility. Two partitions configuration is ideal for me because one being used for OS and the other one being used for Time Machine backup. You can also use Disk Utility later to create a gold image of your OS drive in case if you need to restore the entire OS drive back.
4. Select the entire hard drive on left and go to Erase. Select Mac OS Extended (Journaled) for format and click erase.
5. Click Partition and select 2 Partitions. According to some of the install guides, name with spaces will not work, so keep it short and simple. I used OSX for my OS drive. Use Mac OS Extended (Journaled) for format and set the size you prefer to use. Do the same for second partition. DON'T click apply yet.
6. Click Options on the bottom of the Partition window. Select GUID Partition Table. Click OK.
7. Click apply and click partition on the confirmation message. When Disk Utility is done with partitioning, close Disk Utility.
8. Now you are back in the Mac OS X Installer screen. Click next to proceed with the installation. Click Agree.
9. In this next window, you will see two partitions created earlier. Click OSX and continue.
10. DON'T click Install on Install Summary page yet. Click Customize option to select drivers that will work with Sony BX660P.
11. Check the following options. I installed all applications because there are tools that might come in handy when you need to fix kexts.


12. Click done and install. Skip the media check. Once it's done, you will see the green check mark. Restart the computer.
13. After reboot, first thing you will see is the gray apple screen. Then a splash screen but the display might look messed up and divided into six tiles. That's fine. Ignore it. This will be fixed once you finish with initial setup.
14. After entering all information, you should now be on Desktop. Open System Preferences and open Displays. Choose 1280x768, 75Hz for Resolution, and that should fix the display issue.
15. At this point, everything is working and usable except the network port. Go to System Preferences> Energy Saver and pull the slider to Never for computer's sleep mode. Also, if you turn the wireless switch on, the Bluetooth seems to be working though I have not fully tested the functionality.
16. Now it's time to fix the Marvell Yukon 88E8055 Gigabit Ethernet. Lono's Fixme article, Sophitia's post on InsanelyMac Forum and PCIDatabase.com helped fix this issue, so the credit goes to them.
After reboot, everything should be working except WiFi and Sleep Mode.
/Contents/PlugIns/AppleYukon.kext/Contents/Info.plist
Enjoy your Hackintosh! :P
Important note: This step-by-step guide is intended only for testing and educational purpose. If you like to use Mac OS X Leopard, buy the real Mac. Nothing is better than original hardware and software.
Sunday, March 29, 2009
Sturtevant Falls, Angeles National Forest

Sturtevant Falls (Color)
Originally uploaded by Franklin T..
မေန႔က စေနေန႔ အလုပ္နားရက္မို႔ အျပင္ထြက္ ဓါတ္ပံု႐ိုက္ဖို႔ စိတ္ကူးေလး ရခဲ့ပါတယ္... သူငယ္ခ်င္းက လာေခၚတဲ့ အခ်ိန္မွာေတာ့ တကယ္တမ္း ဘယ္ကိုသြားၿပီး ဘာပံု ႐ိုက္မယ္ေတာင္ စဥ္းစားလို႔ ထြက္မလာပါဘူး... ဒါနဲ႔ ႏွစ္ေကာင္သား အႀကံထုတ္ရင္း Angeles National Forest ဖက္ကို သြားၿပီး ၾကည္႕မယ္ဆိုတဲ့ စိတ္ကူးေလးနဲ႔ ေတာင္ေပၚဖက္ကို ကားနဲ႔ေမာင္းတက္.. ေတာင္ေပၚေရာက္ေတာ့ ေရတံခြန္ေလး တစ္ခု ႐ွိတယ္ဆိုလို႔ ေျမပံုနဲ႔ လမ္းဆိုင္းဘုတ္ေလးေတြ အကူနဲ႔ ေရတံခြန္ေလး ႐ွိတဲ့ဖက္ကို ထြက္လာခဲ့ပါေတာ့တယ္...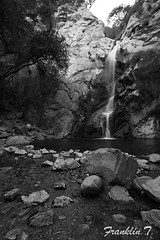
ပထမ အစပိုင္းမွာ ကတၱရာခင္းထားတဲ့ လမ္းေလး.. ေနာက္ တေျဖးေျဖးနဲ႔ ေျမလမ္းေလး ျဖစ္သြားတဲ့ လမ္းေၾကာင္းေလး အတိုင္း.. စမ္းေခ်ာင္းေလးကို ဟိုဖက္က ျဖတ္လိုက္.. ဒီဖက္က ကူးလိုက္နဲ႔.. ေနာက္ဆံုးမွာေတာ့ ေရတံခြန္ေလး ႐ွိရာကို ႏွစ္မိုင္ေက်ာ္ ခရီး ေျခက်င္ေလွ်ာက္အၿပီး ေရာက္လာခဲ့ပါတယ္... ပင္ပန္းရက်ဳိး ႏွပ္ေလာက္တယ္ ထင္တဲ့ ဓါတ္ပံုေလး ႏွစ္ပံုပဲ ရခဲ့ပါတယ္... အျပန္ခရီးမွာေတာ့ ကုန္းဆင္း ကုန္းတက္ေတြကို ေျခက်င္ေလွ်ာက္ ျပန္တက္ခဲ့ရတာမို႔ အခုေတာ့ ေျခေထာက္ႂကြက္သား ေတာင့္တင္းလို႔ ေနပါၿပီ... နားလိုက္ဦးမယ္ဗ်ာ... :P
Sunday, March 01, 2009
Hummingbird

Hummingbird
Originally uploaded by Franklin T..
ငွက္ေတြကို ဓါတ္ပံု သိပ္မ႐ိုက္ဖူးခဲ့ပါဘူး... ဒီ အေကာင္ေလး ကိုေတာ့ ေန႔တိုင္းလိုလို ၿခံထဲမွာ ေတြ႕ေနရတာမို႔ ဓါတ္ပံု႐ိုက္ဖို႔ စိတ္ကူးေလး ရလာပါတယ္... အလိုခ်င္ဆံုးပံုက သူ ေလထဲမွာ ပ်ံေနတဲ့ ပံုေလးပါ... အဲဒီ ငွက္ကေလး ေလထဲမွာ ပ်ံေနတဲ့ပံုက တျခားငွက္ေတြနဲ႔ မတူ.. ထူးျခားၿပီး လွပါတယ္... ဒါေၾကာင့္လဲ အဲလိုပံုေလးကို ဓါတ္ပံု႐ိုက္ခ်င္ေနမိခဲ့ပါတယ္...
မေန႔ကရယ္.. ဒီေန႔ရယ္.. ႏွစ္ရက္လံုး ႀကိဳးစားၿပီး ပံုေတာ္ေတာ္မ်ားမ်ား ႐ိုက္တာေတာင္မွပဲ အခု ပံုေလးေလာက္ပဲ ရခဲ့ပါတယ္... ေလထဲမွာ ပ်ံေနတဲ့ပံု ေဝးစြ.. တခါတခါ ဘယ္ပ်ံသြားမွန္းေတာင္ မသိလိုက္ရဘူး... တနာရီကို မိုင္ ၆၀ ႏႈန္း ပ်ံႏိုင္တယ္ ဆိုပဲ... ဆက္လက္ႀကိဳးစားပါဦးမည္ ေပါ့ေလ...